


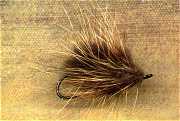
Two more new Coypu patterns: the Furgler and the Coypu Mouse.
In a recent article--Coypu, Coypu, Coypu!--I described my introduction to coypu and gave instructions for three patterns I've developed using this great tying material. Here are two more coypu patterns to try--a coypu version of the gurgler that I call the Furgler, and a large Coypu Mouse.
Recently I gave a few of these flies to some friends headed down to Argentina and Chile and asked them to test them over some real fish (not the fish in my dreams that simply flipped when they saw these exceptionally mousy flies). Their reports were quite encouraging, with the Coypu Mouse taking several brown trout in the twelve-to-fifteen-pound range. The Furgler also raised some mighty nice trout.
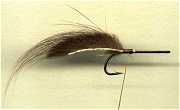
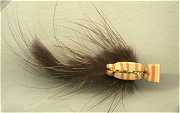
Tying the Coypu Mouse
| Hook: |
Any salmon fly hook with a wide gape # 4-2/0 or (for smaller mice) Daiichi 2451 or Mustad 3406, #4-2 You might also want to tie some of these up for tarpon, in which case use a Daiichi 2546 or Mustad 34007, #2-2/0 |
| Thread: |
Danville’s 6/0, orange, tan, or black |
| Tail: |
Strip of Coypu (this is optional) |
| Body: |
Coypu strip wound around hook shank. |
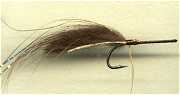
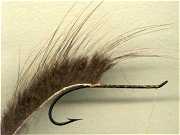 Tie in a layer of thread along the hook shank and at a point just before the bend of the hook tie in a strip of coypu with the points of the guard hairs facing forward.
 Wind the coypu strip forward to a point just behind the eye and tie down. You may finish the fly at this point by tying off and whip-finishing a neat head or--for a buggier look--dub some coypu onto your thread and take several wraps around the head area to give the finished fly a more tapered fur head. Pick out some of this fur so that it blends in with the wrapped fur.
That's all there is to it. Simple, no?
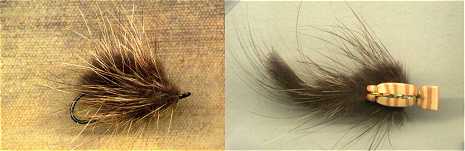
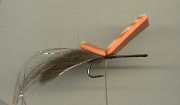
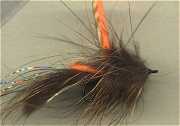
Tying the Furgler
This unusual Gurgler has a fur tail and body of palmered coypu and is a very effective surface fly to use to imitate a mouse or other "critter." While I call this a “mouse” Gurgler, you may also see in it a “shrimp” Gurgler or a “frog” Gurgler or some other critter Gurgler. Tie some up for trout, salmon, steelhead, bass, stripers, tarpon, redfish, whatever you like to fish for. Let the fish decide what kind of Gurgler it is.
| Hook: |
Daiichi 2141 or any ring-eyed salmon hook , #6-1/0 or Daiichi 2451 or Mustad 2406, #4-2 For salt water: Daiichi 2546 or Mustad 34007, #4-1/0 or long-shank Mustad 34011 |
| Thread: |
Danville’s Size A, Flat-waxed nylon |
| Tail: |
Coypu Strip |
| Flash: |
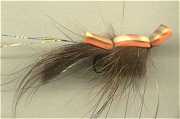
5 or 6 strands of mylar flashabou or Glimmer. This is not used for decorative purposes but after being tied in will be pulled over the shell to snug it down over the body and to protect the foam from fishy teeth. |
| Foam: |
Closed-cell foam. Although the foam used in this example is a double-thick foam (one width of foam attached to another sticky-backed one), any foam, single or double, narrow or wide, thick or thin, will do, as long as it’s thick enough to float your hook and firm enough to create a “gurgle”. The foam used in this example is one I call “bark” foam attached to an orange sticky-back to give it a two- tone effect but this is purely personal taste--or even just whimsy. Truth to tell, almost any color foam will do; I encourage you to be creative. |
| Body: |
Coypu Strip. |
 Tie in a length of coypu strip (with the guard hair points to the rear) at a point just before the bend of the hook if you want a full-bodied fly, more forward if you want a half or third-body fly. Same fly, different effects.
 Tie in five or six strands of flashabou at the base of your tail. Let these hang over the tail until you need them later.
 Tie in a length of foam at the base of your tail.
 Tie in a coypu strip (guard hair points pointing forward) just underneath the rearmost foam (as close to the tie- in point as possible). Trim excess and wind thread forward to a point just behind the eye of the hook.
 Wind coypu strip forward to a point just behind the eye. Tie down and trim excess.
 Pull foam over body (stretching it slightly as you do) so that it fits snugly over body.
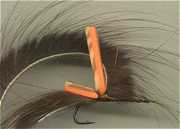
 Trim rear portion of foam as shown in illustration of completed fly above and pull Flashabou or Glimmer tightly over foam and tie down tightly just behind lip of fly. Move thread forward to a place under the lip and in back of the eye. Make several raps and whip finish.
Trim the lip. (You may trim it flat across, with sharp edges, or you may round the edges off; either way, be sure to leave the lip long enough so that it “gurgles” but not so long that it catches a lot of air and spins like a whirligig.
