

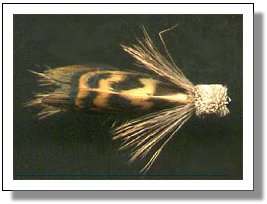
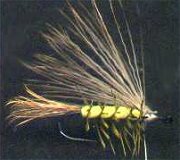
The Pheasant Hopper has appeared in numerous books and articles over the last thirty years or so and is one of my best-known patterns. I first tied it up while camping at Madison Junction in Yellowstone Park in 1970 or thereabouts. That summer I sold my first Pheasant Hoppers to Bud Lilly in West Yellowstone and since that time this fly has been successfully fished all over the world, wherever hoppers are found.
I tie my Pheasant Hoppers with many different body colors, among them: cream, gray, olive, tan, yellow, and occasionally in orange, these being generally the most useful. It’s important to remember, however, that natural hoppers have the chameleon-like ability to blend in with their environment and may vary widely from meadow to meadow or from bank to bank even. Other colors, then, are possible and it would be wise to have with you an assortment of colors and sizes to imitate the hoppers in the immediate area in which you’re fishing.
The Pheasant Hopper is not a difficult fly to tie (not really). The biggest problem tyers seem to have with it lies in proportion. It’s important, then, to be sure that you consider the space you have to work in and to leave sufficient room near the eye for the legs and the head.
Simple as the Pheasant Hopper is to tie, it is, nevertheless, a fairly time-consuming pattern since it has many individual steps. In fact, if you totaled up ALL the steps (choosing the proper feather, preparing it, brushing hairs, cleaning etc.) they would amount to over forty. For the sake of simplicity, though, I've reduced the steps to the number given below.
Tying the Pheasant Hopper
| Hook: |
Daiichi 2461 or 1270, Mustad 94831 or 9671 or other 2x or 3x long hook, #6-14 |
| Thread: |
Danville’s 6/0 or 3/0, color to vary, depending on body color Tail:Moose or stiff Light Elk body hair |
| Body: |
Propylene yarn (color to vary) |
| Rib: |
Furnace or dyed grizzly hackle feather to match body color |
| Underwing: |
Deer or elk body hair (to extend to tip of tail) |
| Overwing: |
Spar-varnished mottled pheasant back feather |
| Legs (or kickers): |
Deer body hair each side of wing to extend approximately half the wing length |
| Head: |
Deer body hair trimmed to shape |
Preparation of Back Feathers
Before proceeding to the steps below, select and prepare a number of pheasant back feathers in a variety of sizes (it’s impractical to prepare less than a dozen or so at a time).
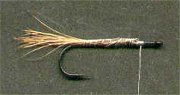
 To
prepare a feather, strip away all unnecessary fluff from the base
of the feather and then dip the feather into spar varnish (natural
or polyurethane). Now, drawing the feather through your thumb and
forefinger, remove any excess varnish while at the same time stroking
the feather to shape so that you have a natural v-shape at the tips.
See illustration of varnished feather. Lay the feather(s) aside
to dry. This drying process may take up to twelve hours, so plan
ahead. With your pheasant feathers prepared, you’re ready
to begin tying.
To
prepare a feather, strip away all unnecessary fluff from the base
of the feather and then dip the feather into spar varnish (natural
or polyurethane). Now, drawing the feather through your thumb and
forefinger, remove any excess varnish while at the same time stroking
the feather to shape so that you have a natural v-shape at the tips.
See illustration of varnished feather. Lay the feather(s) aside
to dry. This drying process may take up to twelve hours, so plan
ahead. With your pheasant feathers prepared, you’re ready
to begin tying.
 At a point slightly forward of the hook bend, tie in 6-8 moose or elk body hairs for the tail (length should be roughly 2/3 the length of the shank). Forward portion of this tailing material should be bound over the shank and then trimmed to form a smooth underbody.
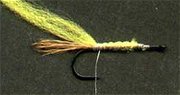 Lay a length of poly yarn on top of the shank so that front section extends forward 2/3 the length of the shank--where the back of your head will begin--and tie in at the base of the tail, winding thread forward to make a smooth underbody. (Number of strands of poly yarn should be appropriate to the size of the fly; avoid making the body too thick or too thin.)
 Strip barbules off one side of a hackle feather and tie this feather in by the butt point where yarn was tied in.
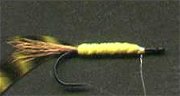 Wind yarn forward, tie down, and trim excess at point where you will eventually tie in your underwing and overwing (approximately 1/3 the way back from the eye).
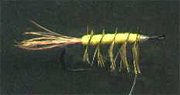 Palmer feather over body towards eye of hook (five turns is usually sufficient). Tie down at front of body and trim excess. Trim bottom and sides of palmered hackle so that the front of the hackle is slightly longer than the rear.
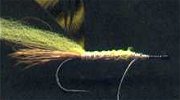
 Tie in a stacked and even clump of deer hair or elk on top of hook shank at point where the body was tied off. Length of hair should reach to tip of tail. Trim excess butts.
 Choose an appropriately-sized, prepared pheasant back feather (one that will, when tied in, extend to at least half-way up the length of tail). Cup this feather over the body so that it appears tent-like. Tie down and trim excess.
 Tie in a small clump of deer hair (stacked and even) on the far side of wing at the base of the wing, points to the rear. These hairs should extend rearward approximately half to two-thirds the length of the wing.
 Tie in a small clump of deer hair on the near side of the wing at the base of the wing (be sure that hair tips are even with those on the far side. Trim butts, leaving approximately 1/2” of butts projecting forward.
Push these butts back now so that they stand away from the shank as a sort of collar (this allows for a smooth transition from legs to head and will form the rearmost part of the head). Take a couple of wraps of thread tight in against the tie-in point to lock in the hairs and to insure that they stand out away from the shank.
 Finally, tie in a clump of deer hair (brushed and clean) with butts pointed towards the rear of the hook. With your thread, distribute hairs evenly around the shank to form the head (if you have trouble with this, see my book, Scratching the Surface, the chapter on Turning Hair into Hackle). If you don’t have a copy handy, try “spinning” the hair; this may also work, although it’s difficult. With hair evenly distributed, trim the hair to a hopper shape, squarish and slightly higher on top than on bottom, which is clipped rather flat. Avoid Muddler or cone-shaped heads. Be careful also to not cut off the legs in the process of trimming.
