


Slippin' and slidin' is exactly what I've been doing a lot of here lately in the northeast, what with all the snow and ice. I'm ready for a winter break--and as soon as I get caught up on my tying and a little ahead in my finances I'm outta here. In the meantime, all this slippin' and slidin' reminded me that I hadn't yet written about or posted tying instructions on the web site for an old favorite fly of mine: the Slider. And so, the time being ripe, here goes.
The Slider and the Gurgler are directly related, both having been first tied by me back in the late '80's, with both flies employing exactly the same simple method of construction. The only difference is that the Gurgler has a protruding lip and the Slider doesn't--and for different reasons. The Gurgler is largely a surface fly whose effectiveness derives in large part from the disturbance created by the protruding lip and is most effective when the surface of the water is relatively undisturbed, when the "commotion" would be most noticeable and attractive.
The Slider, on the other hand, has many more varied uses than the Gurgler. You can fish it on the surface when a quieter fly than the Gurgler is needed--and this is sometimes so--or when the water is choppy and wavy and full of commotion, letting the Slider ride the waves or pulling it under and then letting it swim back up to the top like a wounded baitfish. You can crawl it or skitter it fast across the surface or--if you tie it using only the front 1/3 of the shank--fish it like a stick bait, with the rear end sinking and the front end floating. You can also fish this fly on a sinking line, using it to probe the depths without hanging up on bottom as frequently as a bottom-bouncing fly might do. These are just a few of its many virtues but if you tie up a few of these (for either salt water or fresh water game fish) I'm sure you'll discover more. So, let's throw a party for our fingers and sit down at the vise and tie up a Slider or two. Happy tying!
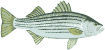
Tying the Silver Slider
| Hook: |
Mustad 34011 or Daiichi X472, 2XL Sizes 2-3/0 for salt water. Daiichi 2141, #6-#1, preferred for fresh water. May also be tied on regular shank hooks for smaller sliders. |
| Thread: |
Danville's Flat Waxed Nylon, White |
Tail: |
White Bucktail (or marabou) |
| Tail Flash: |
Pearl Gartside’s Secret Stuff or Flashabou. |
| Foam Cinch: |
Strands of pearl Flashabou or a single strand of clear 10 lb test monofilament |
| Shell: |
Silver-coated Loco Foam bonded to a white sticky-back foam to form a double layer of foam. If you don't have sticky-back foam, two separate pieces of foam may be used, tied in together. |
| Body: |
Pearl GSS dubbed along the shank |
Ribbing: |
White saddle hackle |
Tying Notes:
Shell
The tying directions given here for the Silver Slider follow what I call the "double-layer" construction method, which I prefer when using two or more layers of foam. The Slider may, of course, be tied using only one layer of foam, in which case it should be constructed using the "single-layer" construction method employed in tying the single-layer Gartside Gurgler (see web site or my book, Scratching the Surface for instructions). When you tie the single-layer Slider, omit the dubbing steps and palmer your hackle between the foam segmentations as described in the single-layer construction. Also, for different effects, you may want to tie this up with the foam shell and body occupying all of the shank or only half or one-third of the shank.
Tail
While bucktail is used here for the tail, other materials may be substituted for different effects: fox tail, saddle hackles, marabou, synthetic hair, etc. Tail lengths may also be experimented with to suit circumstances.
Color
While the dressing given is that of a Silver Slider,Sliders may be tied in a wide variety of colors. Among my favorites are: All-White, Blue/White, Chartreuse/White, Green/White, Red/White, Copper/White, Black, and Copper/Black.
 Starting a bit behind the eye, wrap a layer of thread back along the shank, stopping at a point just in front of the point of the hook. Tie in a tail of bucktail at this point and overlay it with multiple strands of GSS or Flashabou. Trim excess.
 At the base of the tail, tie in one or two strands of medium width pearl Flashabou or a 3"-4" length of 10 lb-test monofilament and, for the time being, just let the rear portion dangle there over the tail.
This step may seem unnecessary or decorative to some but I find it quite practical, since this harder material is needed to both "cinch" the foam tighter to the body and also to protect the the foam from being bitten in half. (If you're fishing for bluefish or other sharp-toothed fish, you might want to use a length of copper wire to accomplish this purpose.)
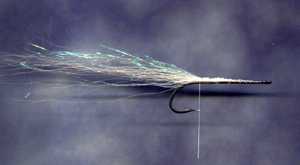
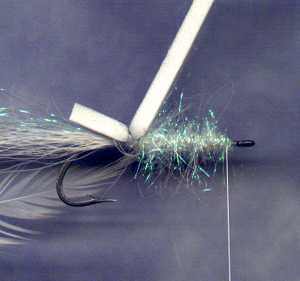
 Cut a 4"-long strip of double-width foam. Width and shape can vary, from narrow to wide, depending on the shape of the baitfish you want to suggest. I generally prefer the foam to be narrow in the rear (at the tie-in point) and wider in the front (at the tie-off point). Lay the foam flat on top of the shank and tie it in at a point just in front of the base of the tail, securing it to the hook with 8-10 very tight wraps of thread.
 Moving your thread forward now towards
the eye and stopping about an eye-length behind the eye, dub
onto your thread a thin coating of GSS and wind this onto
the shank winding back to the rear of the shank to where the
foam is tied in, covering the shank with a layer of dubbing.
Moving your thread forward now towards
the eye and stopping about an eye-length behind the eye, dub
onto your thread a thin coating of GSS and wind this onto
the shank winding back to the rear of the shank to where the
foam is tied in, covering the shank with a layer of dubbing.
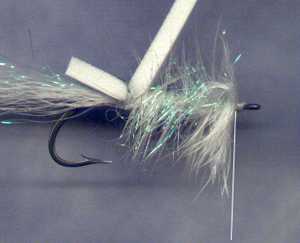
 At this point--just in front of where the
foam is tied in, tie in a white saddle feather (by the tip)
on top of the shank and trim excess. Move hackle to far side
of shank so that it's out of your way until used.
At this point--just in front of where the
foam is tied in, tie in a white saddle feather (by the tip)
on top of the shank and trim excess. Move hackle to far side
of shank so that it's out of your way until used.
 Dub a generous amount of GSS onto your
thread and wind forward covering the shank with this second
amount of dubbing, stopping about an eye-length behind the
eye.
Dub a generous amount of GSS onto your
thread and wind forward covering the shank with this second
amount of dubbing, stopping about an eye-length behind the
eye.
 Wind hackle forward over shank, stopping
about an eye-length behind the eye.(I prefer to end up with
some of the soft marabou-like fibers up near the eye for a
little bit of extra action.) Trim excess. With a bodkin pick
out strands of GSS from the body so that they blend with the
hackle. Trim longer, unwanted strands with your fingers, snapping
off the unwanted material.
Wind hackle forward over shank, stopping
about an eye-length behind the eye.(I prefer to end up with
some of the soft marabou-like fibers up near the eye for a
little bit of extra action.) Trim excess. With a bodkin pick
out strands of GSS from the body so that they blend with the
hackle. Trim longer, unwanted strands with your fingers, snapping
off the unwanted material.
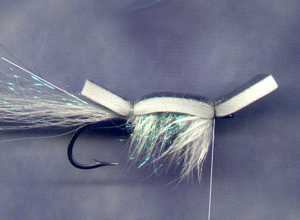 Holding the rear portion of foam with your
left fingers (if right-handed), stretch the foam forward and,
still holding it tightly stretched, tie down the forward section
at a point about an eye-length back from the eye, securing
it to the hook with 8-10 very tight wraps of thread. This
stretching allows for a tighter bond between the foam and
the body (you do not want this foam to stick up away from
the body like a Humpy).
Holding the rear portion of foam with your
left fingers (if right-handed), stretch the foam forward and,
still holding it tightly stretched, tie down the forward section
at a point about an eye-length back from the eye, securing
it to the hook with 8-10 very tight wraps of thread. This
stretching allows for a tighter bond between the foam and
the body (you do not want this foam to stick up away from
the body like a Humpy).
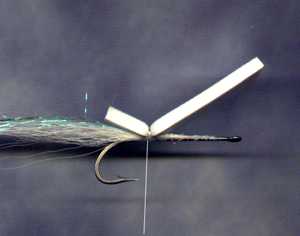
 Trim rear portion of foam so that only
about 1/8" remains.
Trim rear portion of foam so that only
about 1/8" remains.
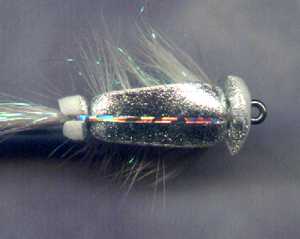
Pull foam cinch--that dangling length of Flashabou or mono-filament--forward over middle of foam shell, tightly enough so that it indents the rear portion of the foam shell, and tie this length down at the point where the forward portion of the foam is tied down. Trim Excess.
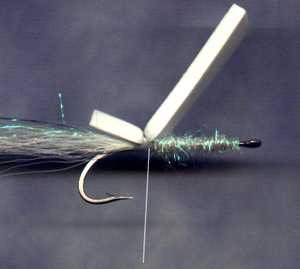
Trim protruding front lip of foam fairly close to a point just behind the eye of the hook. It's this step, of course, which makes the Slider a Slider and not a Gurgler, which it would be if the lip were left a bit longer
